Migrate an Apache Kafka® instance using Apache Kafka® MirrorMaker 2
Learn how to migrate an existing Apache Kafka® cluster to a new service provider using Apache Kafka® MirrorMaker 2 - for instance, when moving from an on-premises system to a managed or self-hosted Kafka cluster.
What you will learn
Follow this tutorial and you'll learn all the steps involved in an Apache Kafka® migration:
- Prerequisites: what should you pay attention to before migrating?
- Syncing data with Apache Kafka MirrorMaker 2
- Migrating Apache Kafka topic schemas
- Migrating Apache Kafka ACLs (Access Control Lists)
- Migrating Apache Kafka consumer group offsets
- Migrating Apache Kafka clients and connectors
What are you going to build
This tutorial outlines all common the steps to migrate an existing Apache Kafka® cluster to a new service provider using MirrorMaker 2.
All migrations are different, but the usual scenario is migrating between on-premises systems to a managed or self-hosted Apache Kafka cluster or vice versa. This tutorial outlines a set of checks, actions and processes to follow to perform a complete migration.
In this tutorial, we'll be migrating to Aiven for Apache Kafka®, but the steps described should work with any other Apache Kafka service.
We'll use MirrorMaker 2 to migrate the data. MirrorMaker 2 is a fully managed distributed Apache Kafka® data replication utility.
Warning
MirrorMaker 2 provides asynchronous replication across clusters. To avoid data loss during the migration, you need to ensure that the replication lag is 0 before pointing the new producers and consumers to the target Kafka environment. More information in the monitor the MirrorMaker 2 replication flow lag section.Prerequisites
The exact migration steps vary depending on the existing source Kafka system. As a general pre-requisite, the source and target system need to have compatible version numbers, feature sets, and connectivity requirements. To break this down further, the tutorial assumes:
-
Client compatibility: Any client interacting with Apache Kafka must be compatible with the version chosen as migration target.
Note
This guide doesn't include any steps to migrate client versions. -
Available Apache Kafka configurations: the custom settings needed in the source system should be available as parameters in the target system.
Note
You can find a list of Aiven for Apache Kafka advanced parameters in the related documentation. -
Available Apache Kafka Connect connectors: if you're planning to migrate a Kafka Connect cluster, review the list of supported connectors or check out how to bring your own Kafka Connect cluster.
-
Connectivity: the source and target clusters need to be connected via MirrorMaker 2 for the data migration. Moreover, you need to ensure all the clients reading or writing to Apache Kafka can connect to the brokers as well as any self hosted Kafka connect cluster.
Warning
As part of the connectivity check you also need to ensure: \n - That the connection bandwidth is high enough to sync the data between environments. \n - That the needed networking setups are available in the target Apache Kafka cluster. Some examples on how to define custom networking setups on Aiven: Firewalls/security groups, VPC peering, Privatelink.Create an Apache Kafka integration endpoint
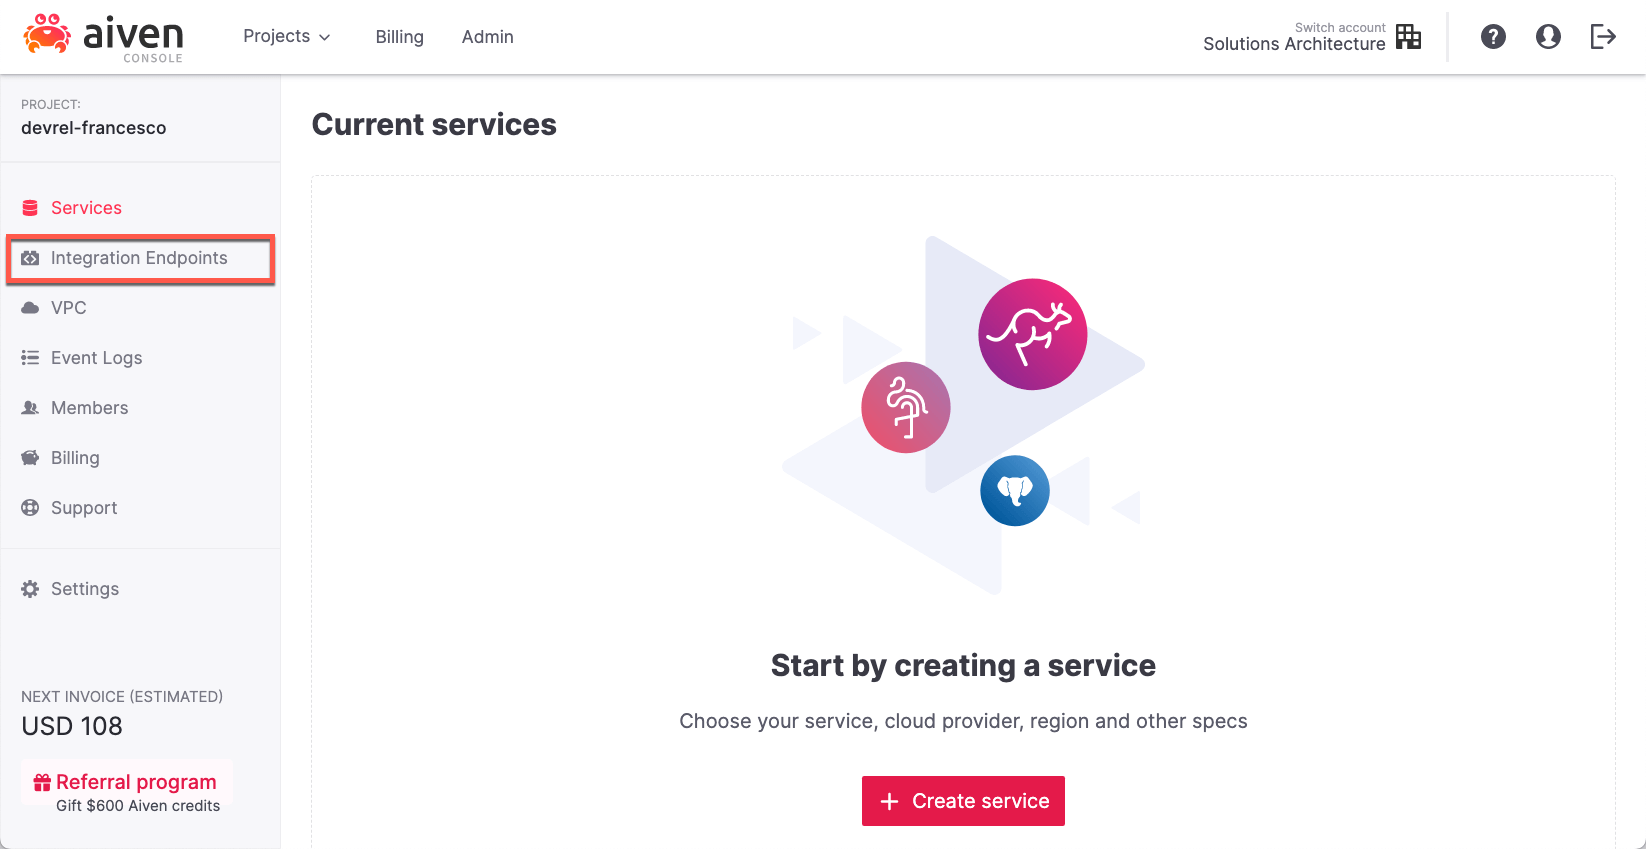
The first step you'll need to perform in the Apache Kafka migration is identifying the source Kafka cluster where the data is migrated from and create a connection to it.
Note
If you're running Apache Kafka MirrorMaker 2 standalone, you'll need to define the source Apache Kafka cluster in themm2.properties file, as defined in the MirrorMaker 2 documentation.If you're using Aiven for Apache Kafka, you need to define the source Kafka cluster as External Integration following the steps below:
-
Go to the Aiven Console.
-
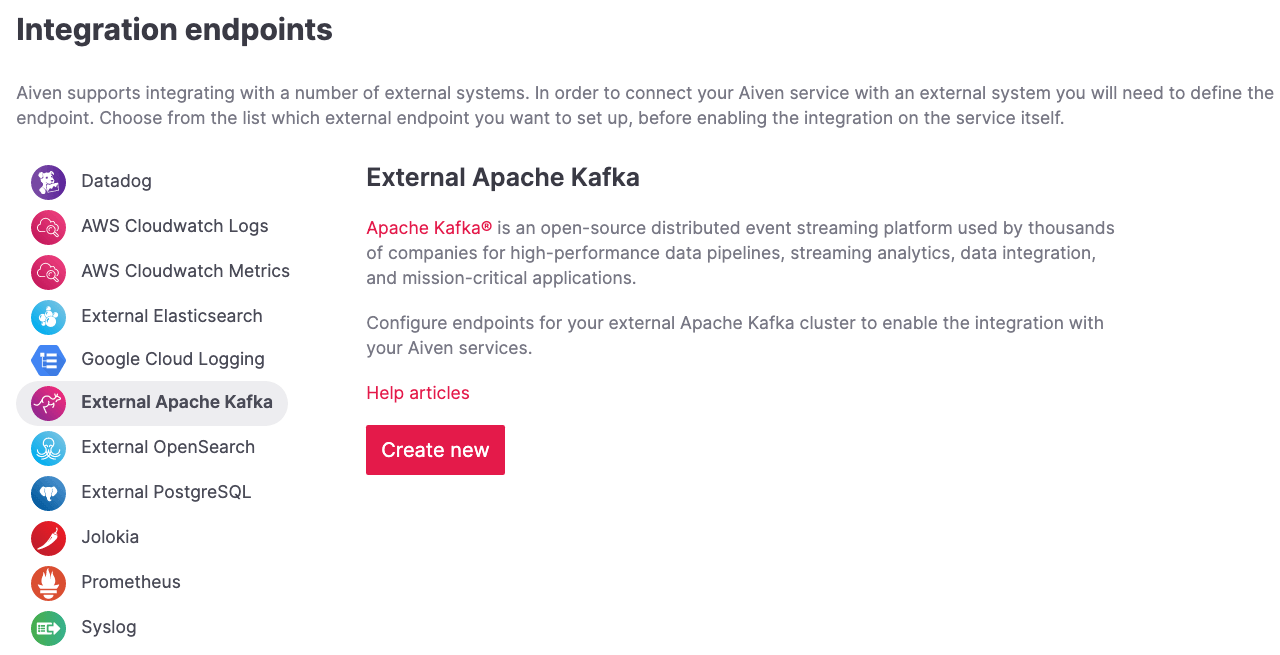
Click on Integration Endpoints.
-
Select External Apache Kafka and click on Create New.
-
Give the endpoint a name (like
mySourceKafkaCluster), this will later be used as reference by MirrorMaker 2. Next, list the bootstrap servers and the Security protocol that need to be used to connect.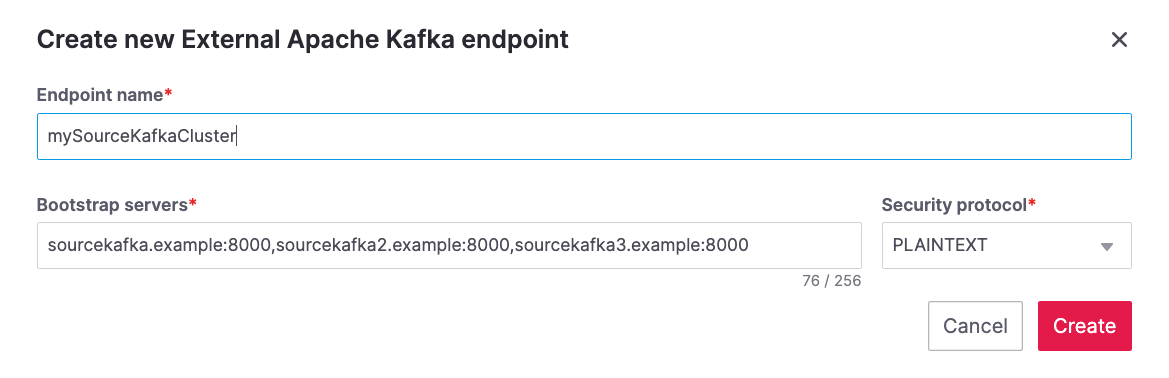
Warning
The external integration setup does not test the connectivity between Aiven and the source Apache Kafka cluster. Always check if additional firewall rules need to be set up to allow MirrorMaker 2 to access your source Apache Kafka cluster. Aiven can associate static IP addresses to all services. It could be useful to associate static IP addresses to Aiven for MirrorMaker 2 to narrow down the list of IP addresses allowed to reach the source Apache Kafka cluster.Create the target Kafka cluster and MirrorMaker 2 instance
Next, create the Apache Kafka cluster to migrate to, and the MirrorMaker 2 instance we'll use to sync the two clusters.
We'll create these services in Aiven for the purposes of this tutorial.
In the Aiven Console, create:
- An Aiven for Apache Kafka service named
demo-kafkafor data streaming. This is the target Kafka cluster for the migration. - An Aiven for Apache Kafka MirrorMaker 2 service named
demo-mm2, MirrorMaker 2 will be used to stream the data from the source Apache Kafka cluster todemo-kafka.
Create an Aiven for Apache Kafka® service
The Aiven for Apache Kafka service is the target cluster for the migration. You can create the service with the following steps:
-
Log in to the Aiven web console.
-
On the Services page, click Create a new service.
This opens a new page with the available service options.

-
Select Apache Kafka®.
-
Select the cloud provider and region that you want to run your service on.
-
Select
business-4as service plan. -
Enter
demo-kafkaas name for your service. -
Click Create Service under the summary on the right side of the console.
Customize the Aiven for Apache Kafka service
Now that you've created your target cluster, you need to customize it's functionality. In the Overview tab of your freshly created service, you'll see a bunch of toggles and properties. Change these two:
-
Enable REST APIs: via Kafka REST API (Karapace) > Enable.
Note
The Kafka REST API allows you to manage and query Apache Kafka via REST APIs. You'll use it to inspect the data in Apache Kafka from the Aiven Console. -
Auto creation of topics: via Advanced configuration > Add configuration option >
kafka.auto_create_topics_enable, switch the setting on and then click Save advanced configuration.Note
Thekafka.auto_create_topics_enablesetting allows you to create new Apache Kafka® topics on the fly while pushing a first record. It avoids needing to create a topic in advance. To read more about the setting, check the dedicated documentation. -
Broker Configuration: ensure you apply all the needed advanced configuration to the target Apache Kafka cluster.
-
Enable SASL (optional): you can enable SASL via the dedicated configuration option.
-
VPC peering (optional): if you need to deploy the Apache Kafka service within a VPC, you can follow the related documentation.
Create an Aiven for Apache Kafka MirrorMaker 2 service
The Aiven for Apache Kafka MirrorMaker 2 service syncs the data between the source and target clusters in the migration. You can create the service with the following steps:
-
Log in to the Aiven Console.
-
Click on the Aiven for Apache Kafka service you created previously, named
demo-kafka. -
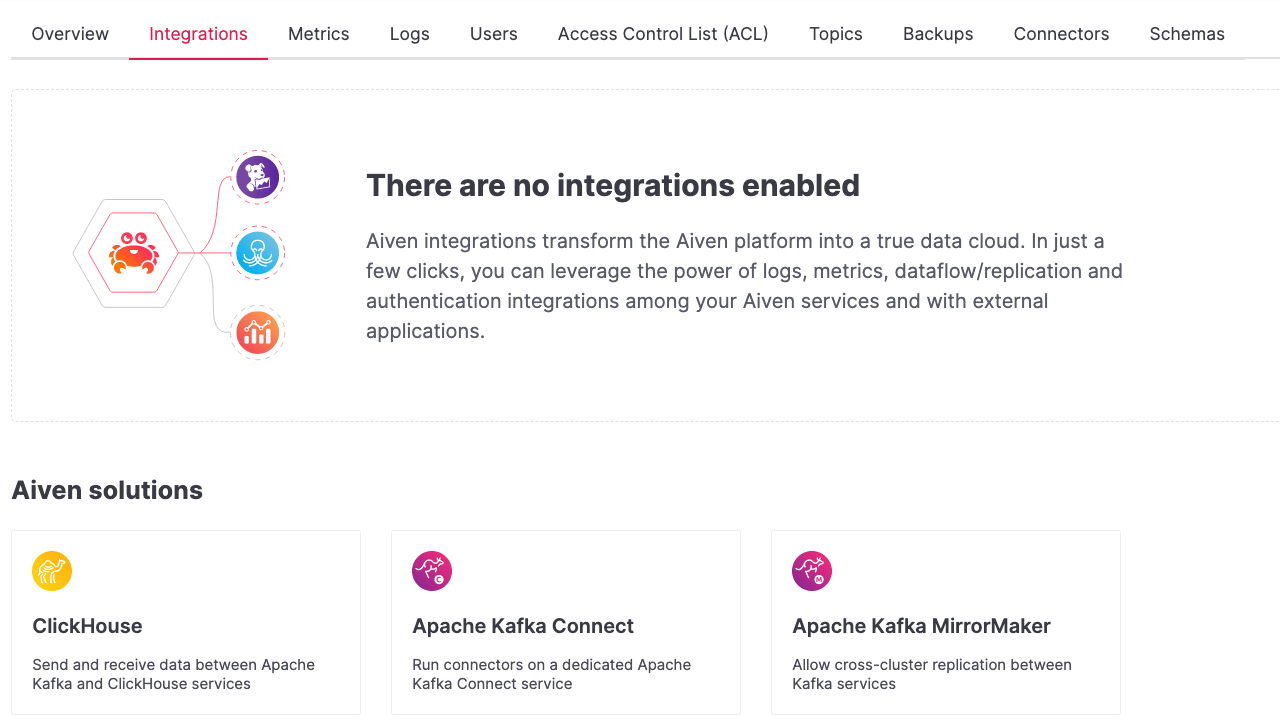
On the Overview tab, scroll down until you locate the Service integration section and click on Manage integrations.

-
Select Apache Kafka MirrorMaker 2.
-
In the new window popup, select the New Service option and click on Continue.
-
Give the new service a name,
demo-mm2, then select the cloud provider, region, and service plan. Then click on Continue. -
Define the Cluster alias, this is the logical name you'll use to define the target
demo-kafkacluster. Usekafka-target.
Once you follow all the steps, you should see an active integration between demo-kafka and demo-mm2 named kafka-target:

Create a data replication using MirrorMaker 2
The next step in the migration journey is to create a data replication from the source cluster to the Aiven for Apache Kafka service named demo-kafka. To create a replication you need to:
- Create an alias for the source Apache Kafka cluster (the target alias
kafka-target). - Define the replication flow.
Create an alias for the source Apache Kafka cluster
To create a MirrorMaker 2 replication flow, first create an alias to point to the source Kafka cluster. You defined the target alias kafka-target during the creation of the MirrorMaker 2 service, so use that.
To create the alias with the Aiven Console you can follow the steps below:
-
Navigate to the MirrorMaker 2
demo-mm2service page. -
Click on the Integration tab.
-
Scroll until you reach the External integrations section.
-
Select Cluster for replication within the available external integrations.
-
Select the endpoint name you defined in a previous step (
mySourceKafkaCluster) and click Continue.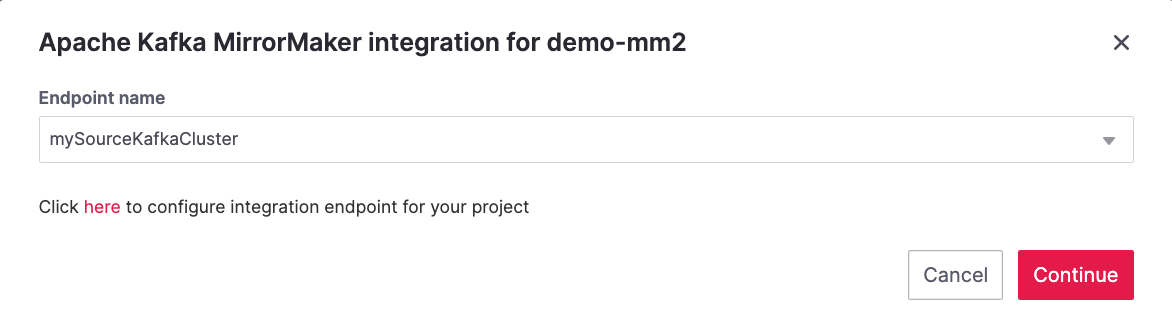
-
Give the source cluster an alias name, for example
kafka-source, and click Enable.
Once the steps are done, you should be able to see the two aliases, kafka-source and kafka-target defined as integrations in the demo-mm2 service:

Warning
If you experience connection problems to the source or target clusters, the MirrorMaker 2 service overview page shows the following error: \n You can also review the service logs by clicking on the Log tab.
Start the MirrorMaker 2 replication flow
In the previous steps you defined MirrorMaker 2 source and target aliases. Now it's time to define the replication flow.
You first need to identify the set of topics you want to migrate to the new cluster, and create a Java regular expression that includes them.
For example, if you want to migrate all the topics starting with customer. and the ones containing .logistic. you can add the two regular expressions: customer\..* and .*\.logistic\..*.
Tip
You can list both topics to be included and excluded in the allow list and stop list.Next, create a MirrorMaker 2 replication flow in the Aiven Console:
-
Navigate to the
demo-mm2service page. -
Click on the Replication Flows tab.
-
Click on Create replication flow.
-
Fill in the replication flow details:
-
Source cluster:
kafka-source- the alias defined for the source Kafka cluster. -
Target cluster:
kafka-target- the alias defined for the target Aiven for Apache Kafka cluster. -
Topics: the Java regular expression defining which topics to include.
For instance
customer\..*to include all topics starting withcustomer..*\..europe\..*to include all topics including with.europe..
-
Topics blacklist: the Java regular expression defining which topics to exclude. E.g.
*\..testto exclude all topics ending withtest.. -
Sync group offset: to define whether to sync the topic containing the consumer group offset.
-
Sync interval in seconds: to define the frequency of the sync.
-
Offset syncs topic location: to provide offset translation, MirrorMaker 2 uses the
mm2-offset-syncstopic, that can be located either in the source or sink cluster. -
Replication policy class: controls the prefix when replicating topics.
DefaultReplicationPolicysets the topic name in the target Kafka service assource_cluster_alias.topic_name(prefixing the topic name with the source cluster alias), whileIdentityReplicationPolicysets the target topic name equal to the source topic name. -
Emit heartbeats enabled: allow MirrorMaker 2 to emit heartbeats to keep the connection open even in cases where no messages are replicated.
-
Enable: to enable the data sync job.
The following represents an example of a replication flow setting:
-
Warning
Before starting the replication flow, you might want to manually create the topics in the target Kafka cluster. MirrorMaker 2 replication flow will not recreate topics with the same configuration options. This step is specifically important if the topic needs to be compacted or if some settings (like partitioning) are key for the correct working of the data pipeline.- Click on Create
After following the steps above, you should see the enabled replication flow:
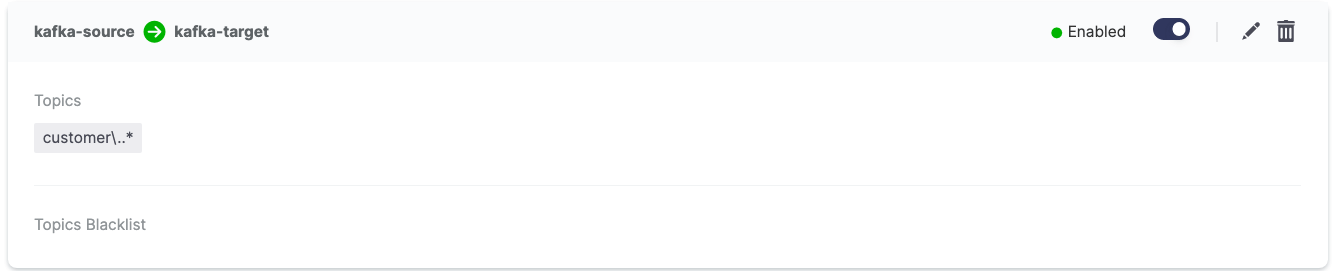
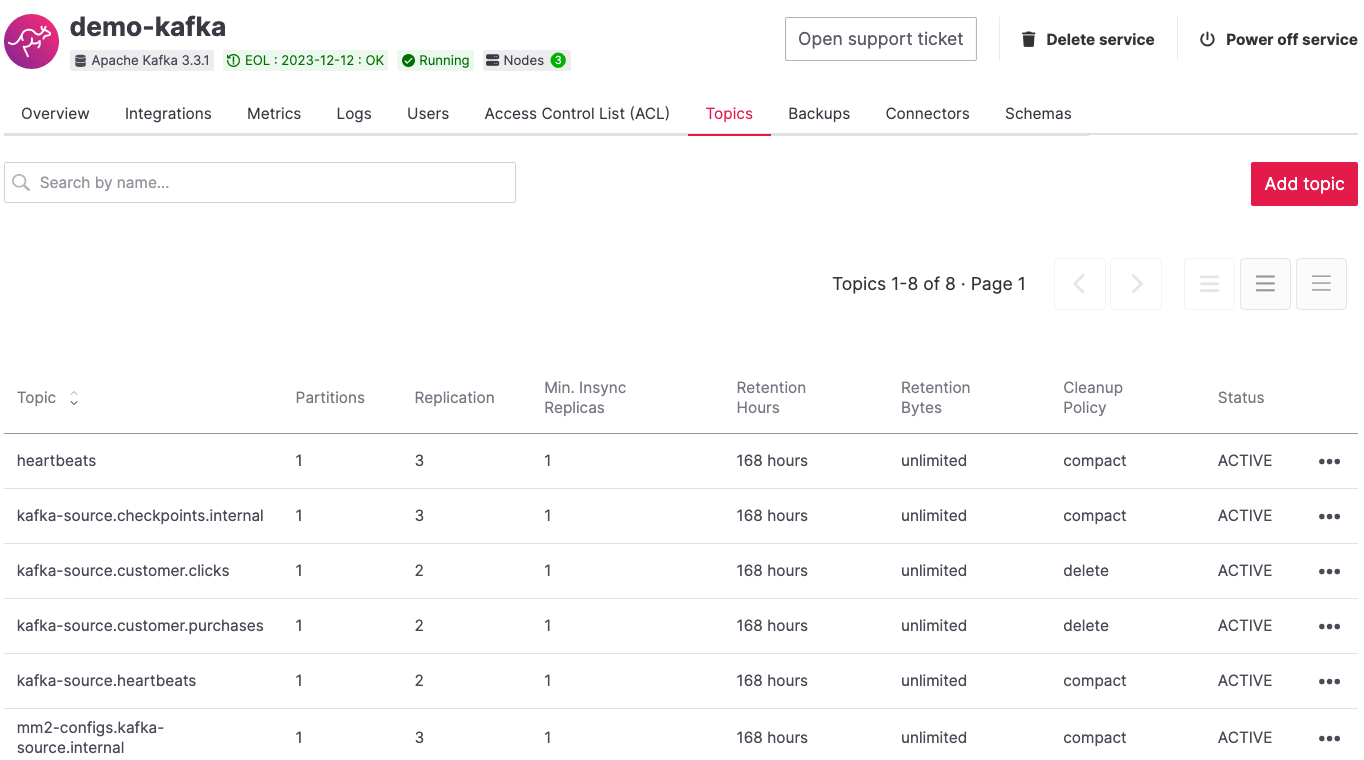
Browsing the target demo-kafka service, you should see the topics being replicated. The following image shows replication (using the DefaultReplicationPolicy) of the kafka-source.customer.clicks and kafka-source.customer.purchases topics together with MirrorMakers 2 internal topics.
Note
Once you start the replication flow, MirrorMaker 2 continuously checks for topics matching the regular expression defined. If you create new topics matching the regex in the source cluster, they'll appear also in the target cluster.Monitor the MirrorMaker 2 replication flow lag
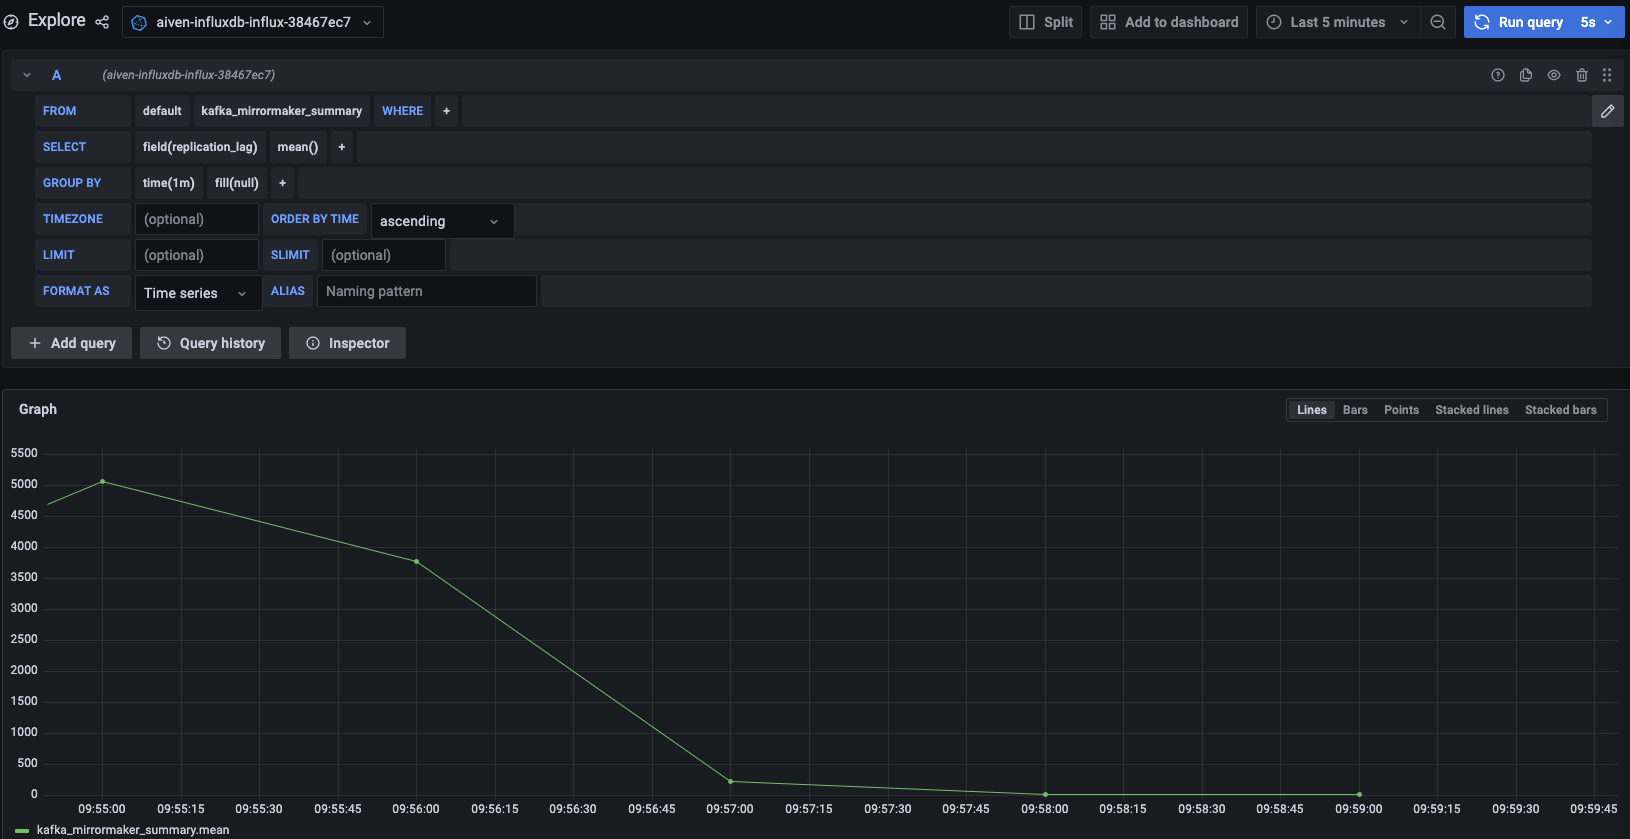
After starting the replication flow, MirrorMaker 2 starts moving data between the source and target Kafka clusters in asynchronous mode. To measure how the replication is performing you might want to check the replication lag: the delay in synchronization between the source and target Apache Kafka cluster. Once the lag is 0, the two Apache Kafka clusters are in sync.
Follow the documentation to review how to create services integrations.
The metric you want to track is called kafka_mirrormaker_summary.replication_lag. The image below showcases a Grafana® dashboard showing the mean MirrorMaker 2 replication lag trending to 0.
Migrate topic schemas
Apache Kafka topic schemas define the structure of the data in certain topics. They can be migrated two different ways:
- By replicating the schemas topic stored in Apache Kafka (usually located in the
_schemastopic). - By extracting the schema information from the source and registering in the target environment using the appropriate APIs.
The second option offers much more control over which schemas are migrated. To register the schemas in an Aiven for Apache Kafka service you can:
- Navigate in the Aiven Console, service page, Schemas tab.
- Use the Karapace rest APIs.
- Use Aiven command line interface.
Migrate access control list
Apache Kafka Access Control Lists (ACLs) define how various users are allowed to interact with the topics and schemas. To migrate ACLs, we recommend extracting the ACL definition from the source Apache Kafka cluster, then recreating the ACL in the target cluster.
If the target of the migration is Aiven for Apache Kafka, you can define the ACLs with:
- The Aiven Console, service page, Access Control Lists (ACL) tab.
- The dedicated Aiven REST API.
- The dedicated Aiven CLI command.
Change client settings
After the replication flow is running and the schemas and ACLs are in place, you can start pointing producers and consumers to the target Apache Kafka cluster.
Warning
To avoid losing Apache Kafka messages during the asynchronous MirrorMaker 2 migration, we suggest stopping the producers, checking that both the consumer lag in the source system and the MirrorMaker 2 replication lag is0, and then pointing producers and consumers to the target Apache Kafka cluster. The migration process provides a detailed series of steps to follow.If the target of the migration is Aiven for Apache Kafka, follow the documentation to download the required certificates and connect as a producer or consumer.
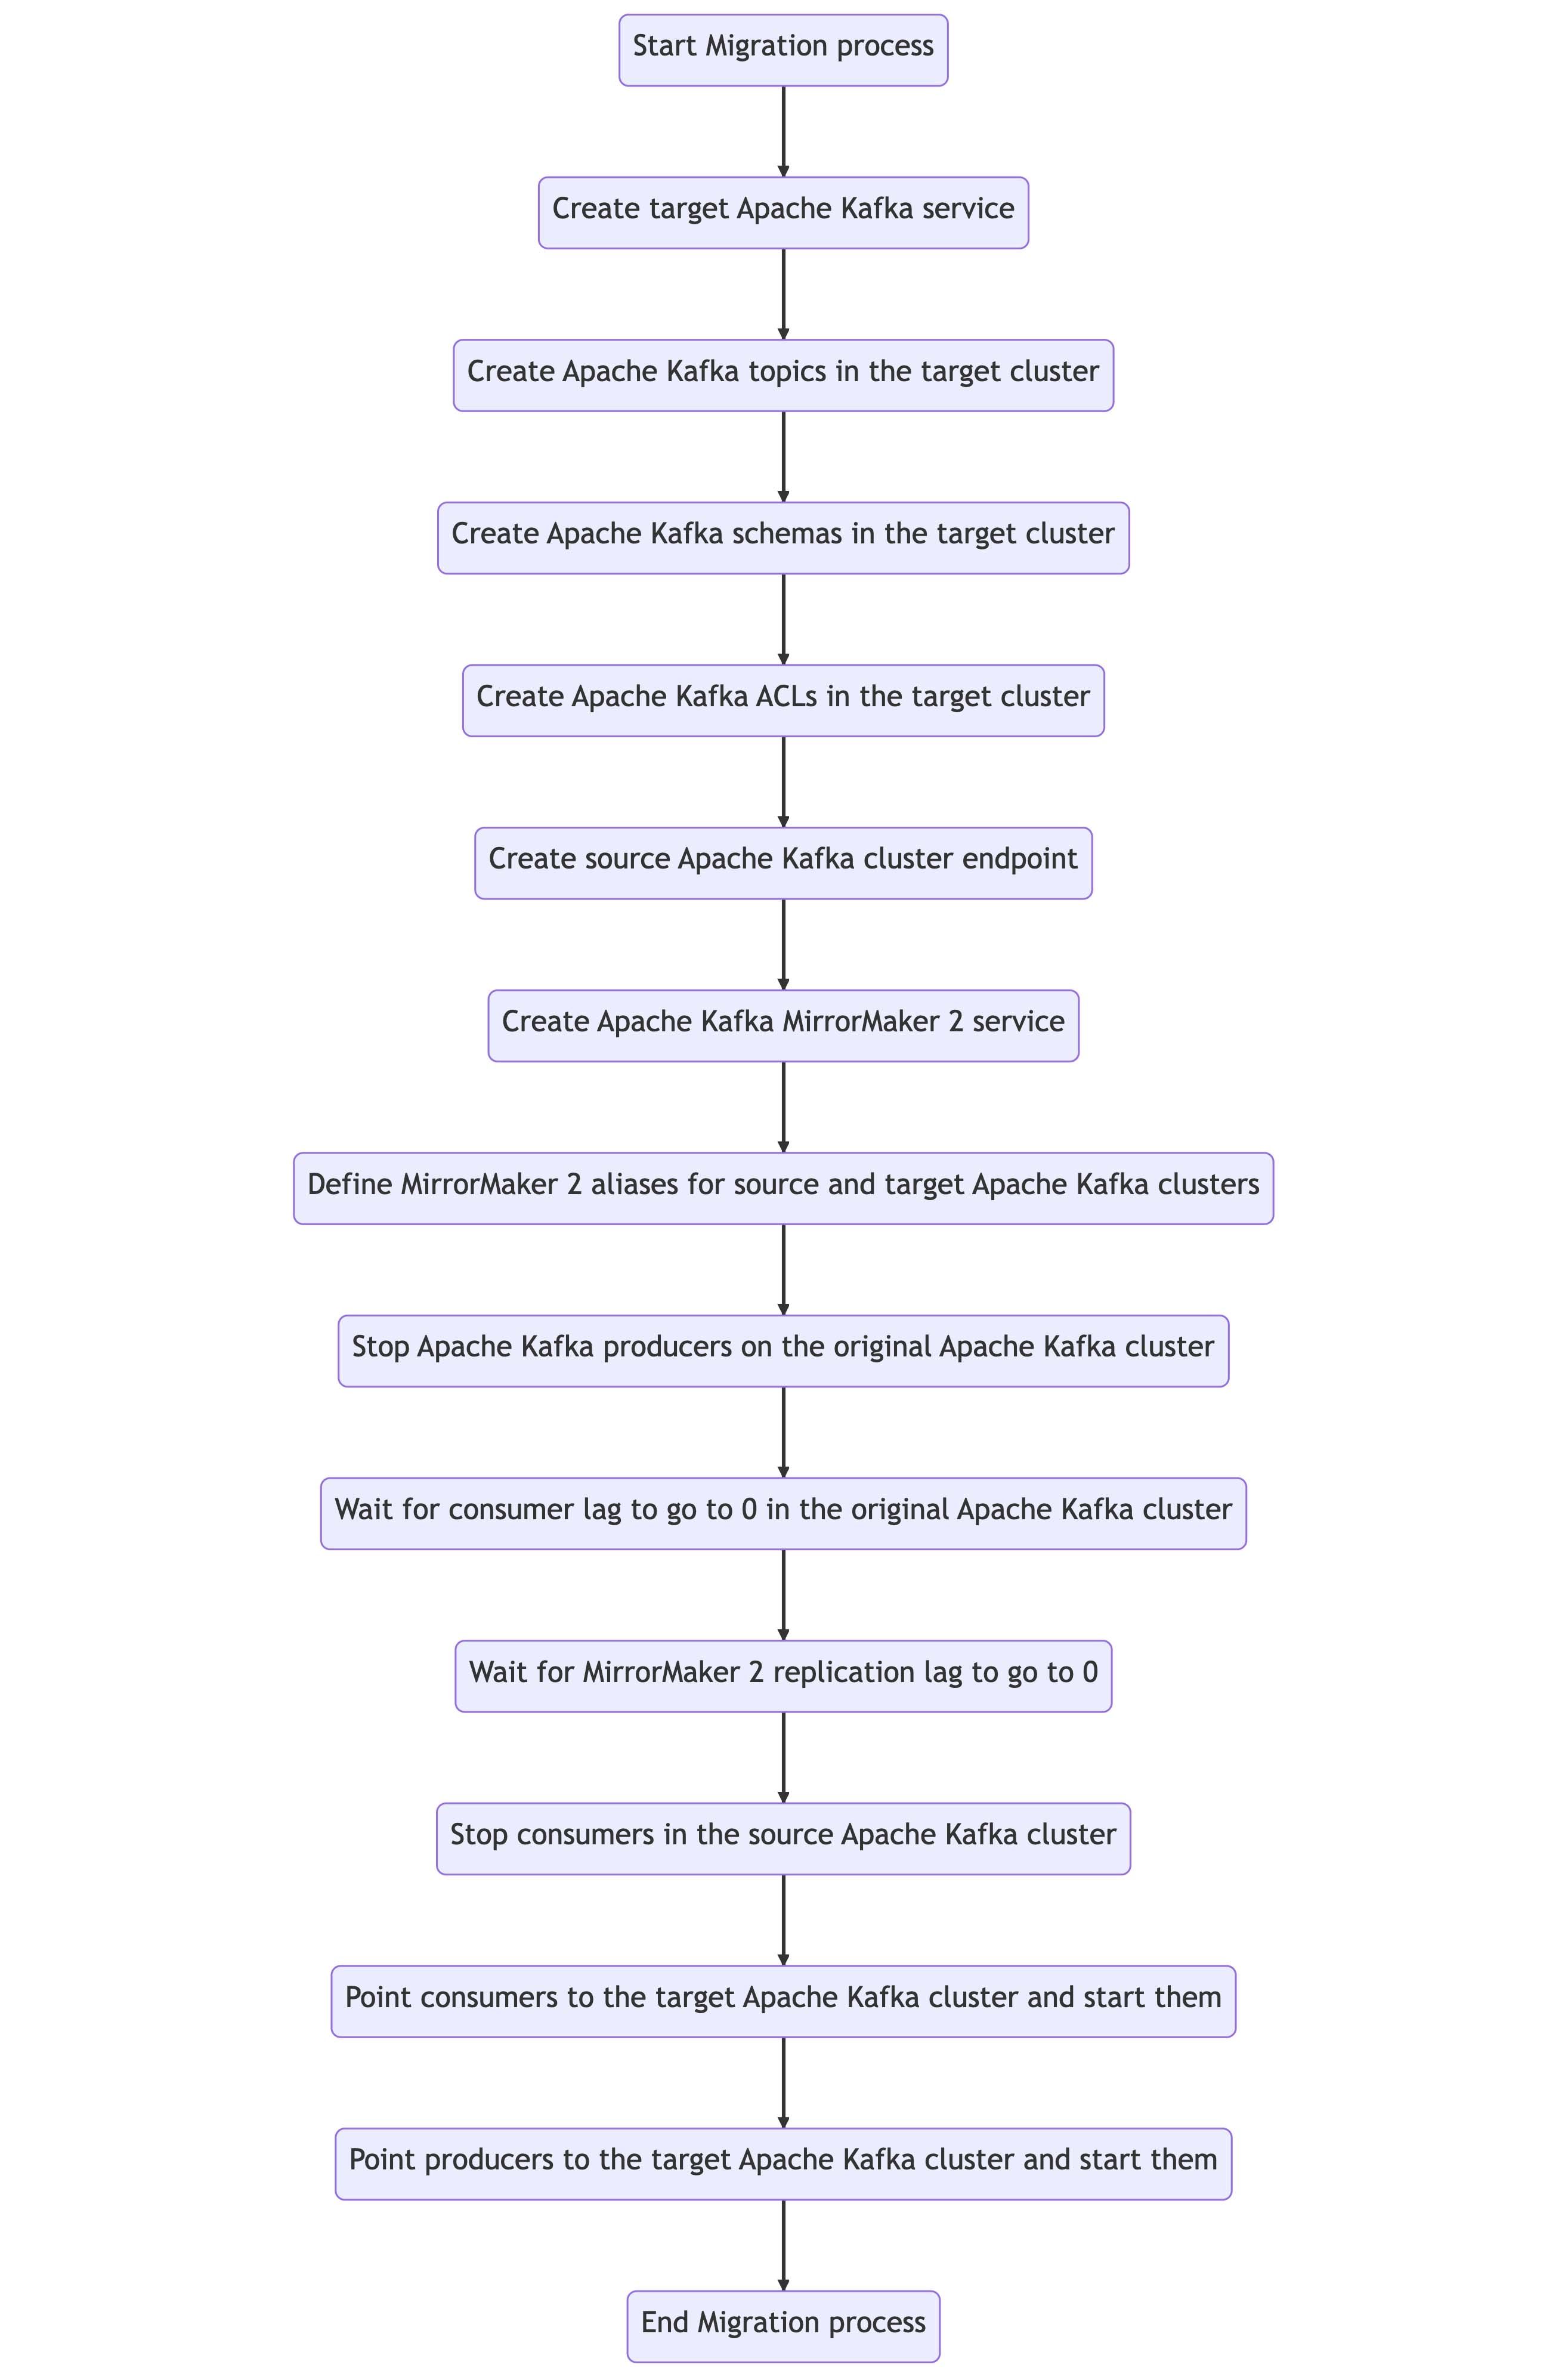
Complete migration process
The following diagram showcases all the steps included in an Apache Kafka migration process.
Check the migration results
When the migration process terminates, check the target Apache cluster to ensure that:
- All the ACLs are in place: in the Aiven Console service page -> Access Control List (ACL) Tab.
- All the schemas are present in the target schema registry (Karapace for Aiven for Apache Kafka): in the Aiven Console service page -> Schemas Tab.
- All the topics included in the replication flows defined are present, and the data is flowing: in the Aiven Console service page -> Topics Tab.
- All the producers and consumers are pointing to the target cluster and correctly pushing/consuming data